
1. 심박센서 원리
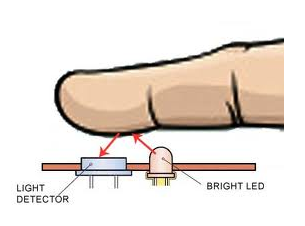
심박센서는 LED불빛을 손끝에 비추고 여기에서 반사되는 빛을 측정하는 방식이다. 심장이 박동되어 손끝에 피가 흐를 때에는 세포에 혈액세포에 빛이 흡수되므로 반사되어 측정되는 빛의 감도가 감소되고 이에 따라 저항값이 변동되므로 흐르는 전압도 변화되게 된다. 이 전압변화를 증폭시켜 펄스로 인식하고 심장의 박동으로 인식하는 것이다. 통상 저가의 심박센서는 녹색LED 하나를 사용하지만 여기에 적외선LED를 추가하고 적외선 반사량을 측정함으로써 혈중산소포화도 측정 용도로 사용하기도 한다.
2. 심박센서의 구조
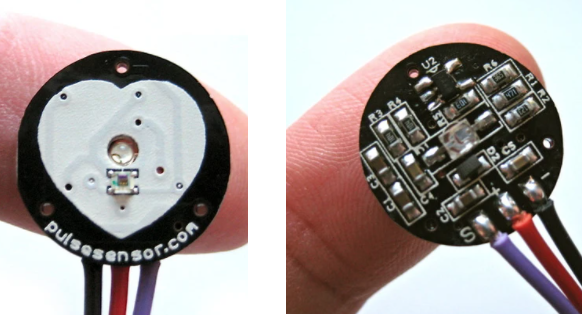
심박센서는 전면에 LED전구와 수광센서가 나란히 배열되어 있으므로 이위에 손가락 끝을 올려놓고 측정하면 되고, 통상 3개의 단자가 있는데 전원공급용 +, - 단자와 신호수신을 S단자가 있는데 이 S단자에 출력되는 신호를 아두이노 등에서 아날로그 신호로 읽어 해성하면 된다.
3. 심박센서 사용을 위한 Library설치
아두이노 IDE에서 스케치 -> 라이브러리 포함하기-> 라이브러리관리 화면에서 Pulsesensor를 검색하여 설치하면 된다.

4. 심박센서 작동 예제
Pulsesensor 라이브러리를 설치하고 파일 -> 예제 메뉴를 보면 다음과 같이 pulsesensor 관련 예제들이 포함되어 있는것을 확인할 수 있다.
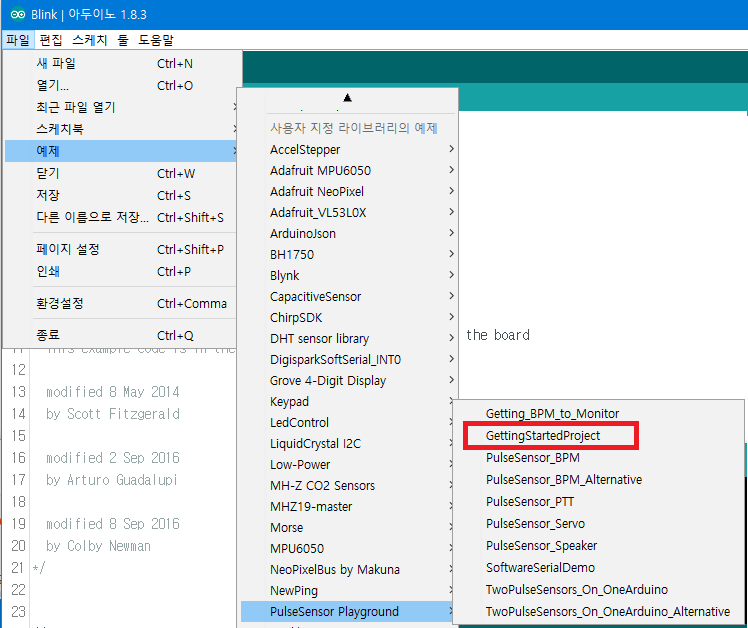
예제 중 가장 간단한 GettingSstartedProject를 선택해서 실행시켜 본다.
/*  PulseSensor™ Starter Project and Signal Tester
 *  The Best Way to Get Started  With, or See the Raw Signal of, your PulseSensor™ & Arduino.
 *
 *  Here is a link to the tutorial
 *  https://pulsesensor.com/pages/code-and-guide
 *
 *  WATCH ME (Tutorial Video):
 *  https://www.youtube.com/watch?v=82T_zBZQkOE
 *
 *
-------------------------------------------------------------
1) This shows a live human Heartbeat Pulse.
2) Live visualization in Arduino's Cool "Serial Plotter".
3) Blink an LED on each Heartbeat.
4) This is the direct Pulse Sensor's Signal.
5) A great first-step in troubleshooting your circuit and connections.
6) "Human-readable" code that is newbie friendly."

*/


//  Variables
int PulseSensorPurplePin = 0;        // Pulse Sensor PURPLE WIRE connected to ANALOG PIN 0
int LED13 = 13;   //  The on-board Arduion LED


int Signal;                // holds the incoming raw data. Signal value can range from 0-1024
int Threshold = 550;            // Determine which Signal to "count as a beat", and which to ingore.


// The SetUp Function:
void setup() {
  pinMode(LED13,OUTPUT);         // pin that will blink to your heartbeat!
   Serial.begin(9600);         // Set's up Serial Communication at certain speed.

}

// The Main Loop Function
void loop() {

  Signal = analogRead(PulseSensorPurplePin);  // Read the PulseSensor's value.
                                              // Assign this value to the "Signal" variable.

   Serial.println(Signal);                    // Send the Signal value to Serial Plotter.


   if(Signal > Threshold){                          // If the signal is above "550", then "turn-on" Arduino's on-Board LED.
     digitalWrite(LED13,HIGH);
   } else {
     digitalWrite(LED13,LOW);                //  Else, the sigal must be below "550", so "turn-off" this LED.
   }


delay(10);


}
예제프로그램을 실행시켜 보기 위해서는 +,-전원단자를 연결하고 S단자에서 나온 케이블을 아두이노 A0 (아날로그 단자 0번) 단자에 연결한다.
프로그램을 LOAD하고 녹색LED 불빛이 보이는 쪽 위에 손가락을 대고 있으면 심박 작동에 따라 아두이노 내장LED가 깜박깜박하는 것을 확인할 수 있다.
아두이노 IDE에서 툴 -> 시리얼 모니터를 선택해서 보면 다음과 같이 심장박동을 챠트형태로 확인할 수 있다.
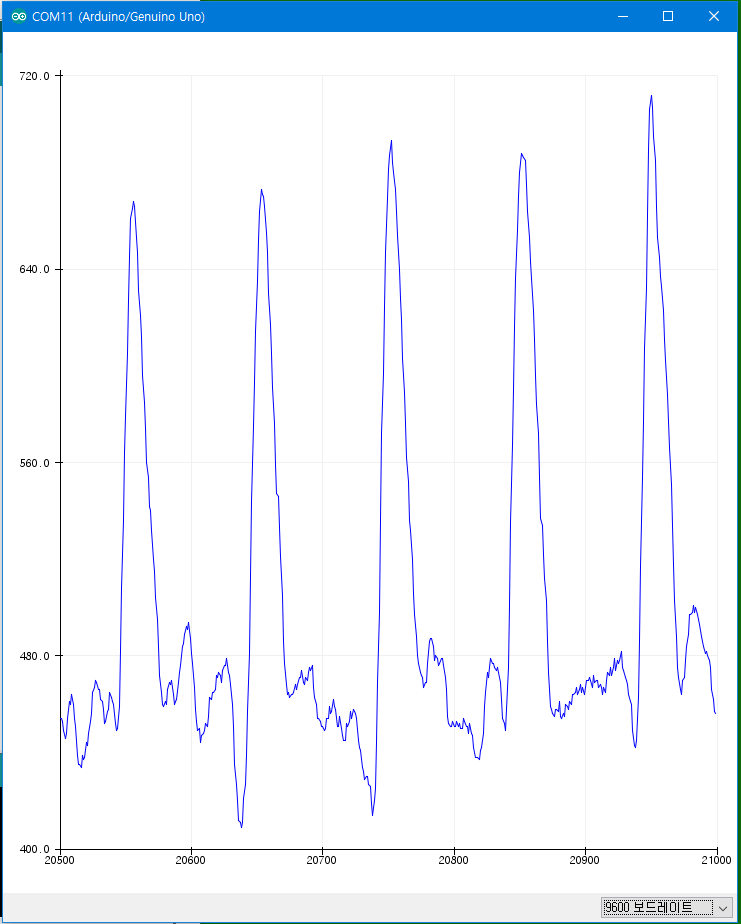
심장의 박동수는 위 파형의 피크값 사이의 시간 간격을 계산하여 1분에 볓번 발생되는지 산출한 숫자인데 예제 중 Getting_BPM_to_Monitor 프로그램을 실행시켜 표시해 볼 수 았다.
5. 평균 심박수
심박수는 운동 또는 긴장상태에서는 빨라지고 편안하게 안정된 상태에서는 느려진다. 남녀구분이나 나이에 따라서도 달라지는데 휴식기의 평균 심박수는 다음과 같다고 한다.

'각종 부품 사용방법 > 입력장치' 카테고리의 다른 글
| ESP32-CAM Adapter보드 활용방법 (0) | 2022.02.10 |
|---|---|
| 젯슨나노(Jetson Nano)에서 Raspberry 카메라 사용하기 (0) | 2021.02.18 |
| 라즈베리파이 카메라 사양과 사용방법 (1) | 2021.01.30 |
| MPU6050 모션센서를 프로세싱으로 시뮬레이션해 보기 (0) | 2021.01.18 |
| MPU6050 6축 모션센서 사용방법(GY-521) (0) | 2021.01.16 |